|
Lense Flares/Coronas
To include coronas around light sources, you must
first of all activate the coronas display option for
the software engline in the advanced options menu. Otherwise
they won't be displayed in the editor. In UnrealEd,
the advanced options are located in the menu at 'Preferences'
(UnrealEd2: Advanced Options). Go to the display options
for software rendering and set 'Coronas' to 'true'.
Select the light(s) to which you want to apply coronas,
and select a corona texture from the textures menu (Package:
GenFX). Now, go to the lights options and under 'Lighting'
set 'Corona'='true'. Now activate the 'Display' tab
and find the option called 'Skin'. Make sure you've
selected your corona, and click on 'Use'. Now you've
got to do a geometry rebuilt before the coronas will
be displayed.
Tip: When you set lights, you will always have some
space to the wall texture, so that it will be lighted
better. If you apply coronas to this light, it will
look strange, because the corona will float in the air,
in some distance to the light source. To fix this, just
duplicate the light, move it really close to your light
source, set the brightness to zero, but leave the hue
and saturation, so that the corona will have the light's
color. You can change the size of the corona in the
'Display' menu with 'Draw Scale'.
Back to the top
Level End Teleporters
Changing between the levels is done with special 'teleporters'.
You find the level teleporter in the 'Classes' browser
under 'Triggers'. The teleporter is a special sort of
trigger. In the options menu under 'Teleporter', you
can specify the 'URL'(=level) to which the teleporter
will warp the player when it steps into it's trigger
radius. There's a special format which the URL-entry
has to have. Type in the levelname as following: levelname#entree?peer.
Just replace 'levelname' with the name of the target
map file.
Back to the top
Invisible Block Brushes (for Masked Walls)
Have you ever built a masked wall like a fence or
a floor grate and wondered why you can pass right through
it? Well, this is because sheet brushes cannot block
the player. To do this, you must build an extra blocking
brush. This is usually done by creating a cube brush
that has the measures of the masked wall and a small
depth, like 4 units. Place this brush at the same location
as your sheet brush for the masked wall and open the
"Insert a special brush" dialog. From the menu
there, simply choose "Invisible Collision Hull",
and add your brush in. Now you will be blocked by this
invisible wall, as well as weapon shots and enemies.
Back to the top
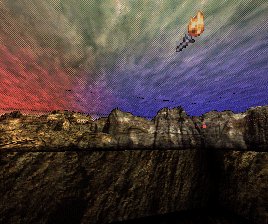
How to build a sky (tutorial)
A sky is basically a huge box area, in which the mountains
and clouds are positioned as sheet brushes. You can
orientate yourself at the original sky designs in the
game as well as build completely new sceneries. Once
I built a sky where the mountains were on fire by placing
fire-sheet-brushes behind them, which looked quite surrealistic.
Experimentate a bit with your sky to find a design that
you like. However, it adds much to the atmosphere of
your map if you build a sky that fits the design of
the level. For (a very stupid) example you wouldn't
like to build a night sky if the whole outside areas
of your map are brightly lighted.
The standard sky graphics that are used in the game
are contained in the package SKYBOX, but there are other
nice skies in SHANESKY and SHANEDAY.
To build a sky area like in the original game, follow
these steps:
Step 1: The big basic sky box
Create a box brush that that has a length and width
of 2048 and a height of 256. The floor should have
a rock texture as included in one of the sky packages.
For the walls and ceiling choose a texture that will
be the background of your sky. This will be stars
or clouds in most cases.
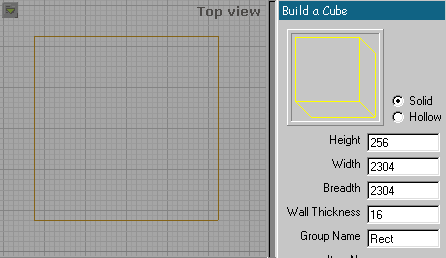
- The basic sky-box -
Step 2: The inner box (optional)
Now build another box in the centre of the first
one with a length and width of 512 and a height of
128. Position it below the big brush, so that you
create a 'pit'. The texture for the walls and the
floor should be rock (also from the sky packages).
This step is optional, but you may include if for
the case that you want to change the "view height"
of the skybox (see step 6 for more information about
the SkyZone actor).
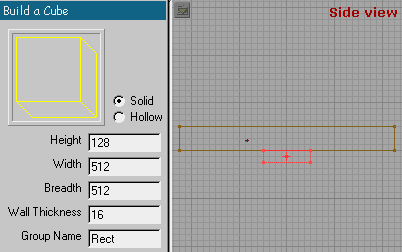
- The inner box -
Step 3: The mountain range
Now we must build the mountains. These consist of
eight sheet brushes (X-wall or Y-wall), two per side
of the 'pit', each with a height of 128 and a width
of 256. In the sky packages you will find sets of
four mountain textures. Just begin with the uppermost
texture for your first mountain segment, then go to
the next texture down with each segment. After segment
four you start with the uppermost texture again. So
the textures fit together horizontally. Ignoring this
procedure will create ugly 'jumps' between the segments.
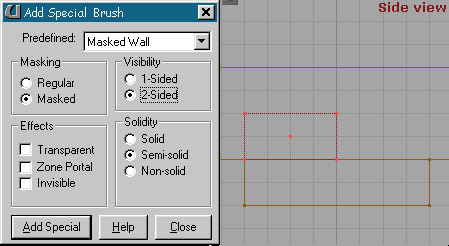
You place the brush in clockwise order at the top
edges of the pit. In the 'add a special brush' menu
choose the following options: Masked, 2-sided.
The Unreal leveldesigner use the special light option
for the mountains. Special light is a normal light
which is set to 'special light' in the 'lighting'
menu option. It will only affect those walls that
have the 'special light' tag assigned to them. You
need not use this kind of light, I've done skies without
it and they look...the same (well, you can do some
special effects with it).
- The first brush for the mountain ridge -
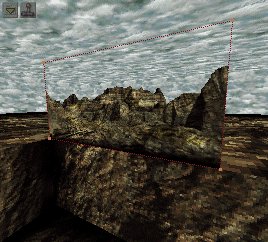
- The first mountain segment in the 3D-view -
Step 4: A cloudy sky?
Now we will put some moving clouds into our sky.
Build a sheet brush (floor/ceiling) with the measures
2304 x 2304, just like the big sky box. Position it
between the mountains and the top of the sky box.
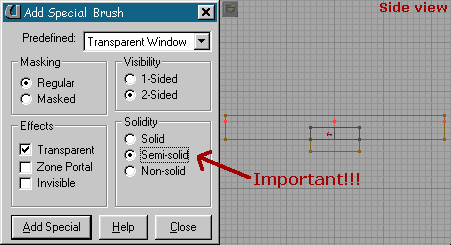
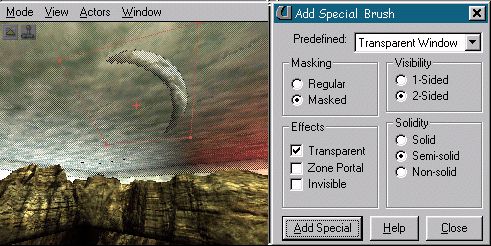
In the 'special brush' menu activate the following
options: Regular, 2-Sided, Transparent, U-pan
or V-pan (look which one looks better with the clouds),
and VERY IMPORTANT, Non-Solid. If you choose
something other than non-solid, the clouds will not
be shaded in the game and be displayed at full bright.
You will find many clouds in the texture package GENFLUID.
Now choose a nice cloud texture for it and add it
in.
- The brush for the clouds -
Step 5: Light up the sky
Time to put some lighting into it. In the easiest
case, you need only one light, which lights up the
whole sector. But it looks better if you put some
additional lights into it. Look at the original skies,
especially those later in the game where it's dark.
You'll notice that far away there are things like
red dusk lights or blue lighted clouds. For these,
put some lights outside of the middle sector, and
set the 'light type' to 'cylinder'. This will make
round lights. Play around with the light options until
you get a cool color.
- Try around with the lighting! -
Step 6: The Sky-Zone-Info
You must insert a 'SkyZone' zone-descriptor into
the middle sector. This descriptor will be the 'eye-height'
from which the sky will be shown in the game. This
sounds confusing, an eye-height for the sky? Just
do an experiment: At first, put the descriptor at
the same height as the top of the mountains and see
how it looks in the game (for this you must have finished
all the steps below). Then, move it to the bottom
of the middle sector and start the map again. See
the difference? Normally, the descriptor is placed
at the bottom height of the mountains. You will find
the descriptor under INFO/ZONEINFO/SKYZONEINFO. If
you go to the properties, section ZONELIGHT, you'll
see the two options called 'TexUPanSpeed' and 'TexVPanSpeed'.
Here you can set the speed with which your clouds
move over the sky.
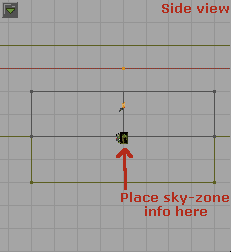
- The sky-info -
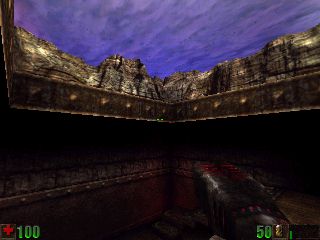
Step 7: Where should the sky be displayed?
Now you must tell the engine which ceilings (or
floors, or walls (which can be necessary sometimes))
it should replace with the sky. Just select your
sky-ceilings, and in the options menu, activate
'Fake Backdrop'. The Unreal levelbuilders give these
ceilings a sky-like texture, like the clouds you
use in your sky, and set the ceiling to 'Unlit',
which advisable because this way your won't spend
extra time for light calculations on these walls
that you wouldn't see at all in the game.
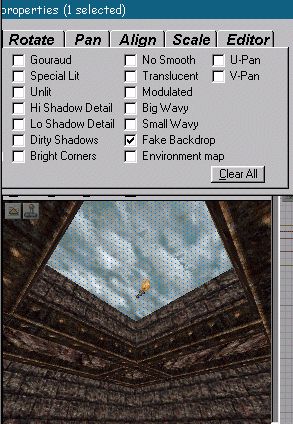
- Set the ceiling to 'Fake Backdrop' -
Step 8: Additional stuff to hang into the sky
If you want, you can add additional details to
the sky, like a moon or a bright star (or several
of these). You'll find the graphics for them in
the sky packages. Moons and such things are built
with sheet brushes. A moon texture is normally 128x128.
The brush should be placed above the middle sector
and rotated a bit so that the moon will 'look' at
the SkyZone descriptor (huh? See the pic). Funnily,
Epic's designer placed moons under the clouds, not
above them! The moon will be added via the 'special
brush' menu, with the following options: Regular,
2-Sided (can also be 1-Sided, since you see only
one side), Transparent, Non-Solid. There are
very nice moon graphics, some have a light corona
around them.
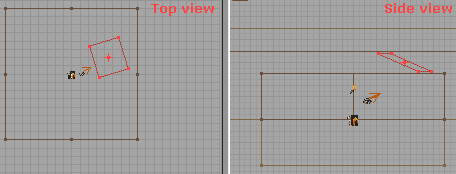
- The brush for the moon has been rotated to 'face'
the zone-info -
- The moon in the 3D-window -
Step 9: Done!
That's it already. Save the map, load up Unreal
and enter your map.
Back to the top
|